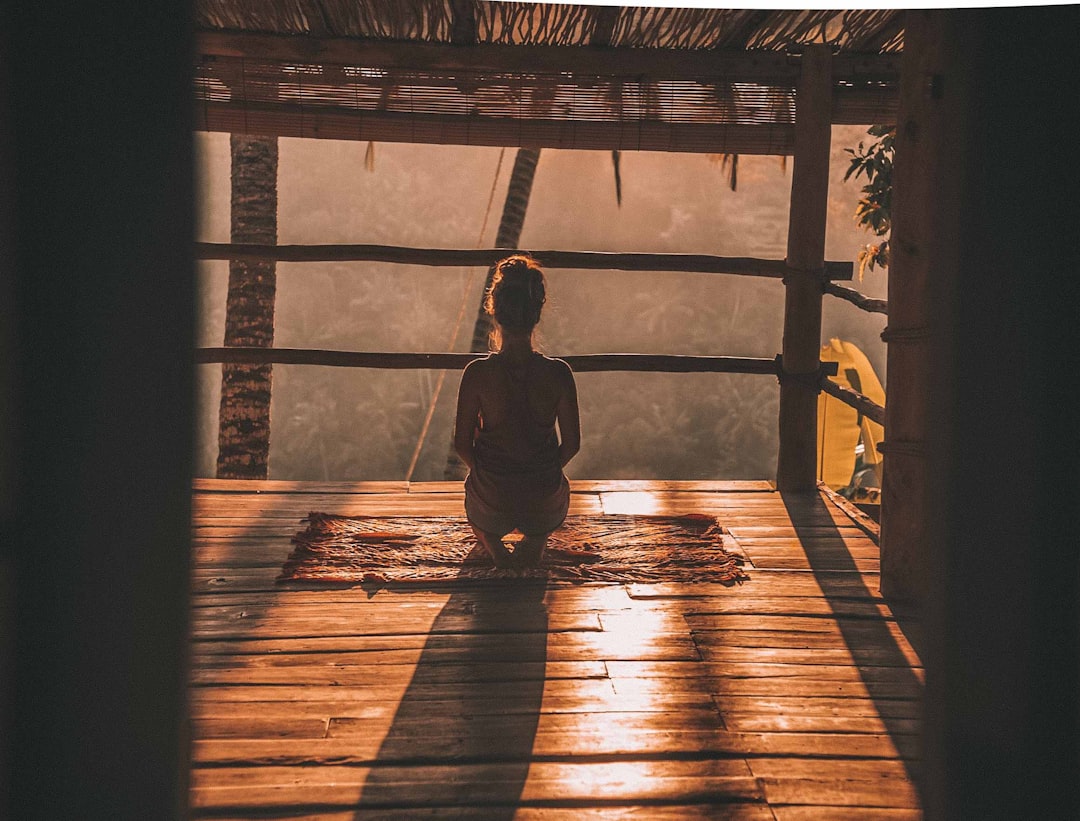
Aerial yoga is a distinctive form of yoga that combines traditional yoga poses with the use of an aerial hammock, providing practitioners with a dynamic and invigorating experience. Unlike traditional yoga, which is predominantly practiced on a mat, aerial yoga introduces the use of a specialized hammock that is designed to support up to 300 kilograms, allowing for a wide range of movements and poses that are not typically achievable in traditional yoga practices. This unique approach to yoga offers individuals an opportunity to explore new dimensions of their physical and mental well-being, making it an increasingly popular choice for yoga enthusiasts seeking an innovative and engaging practice.
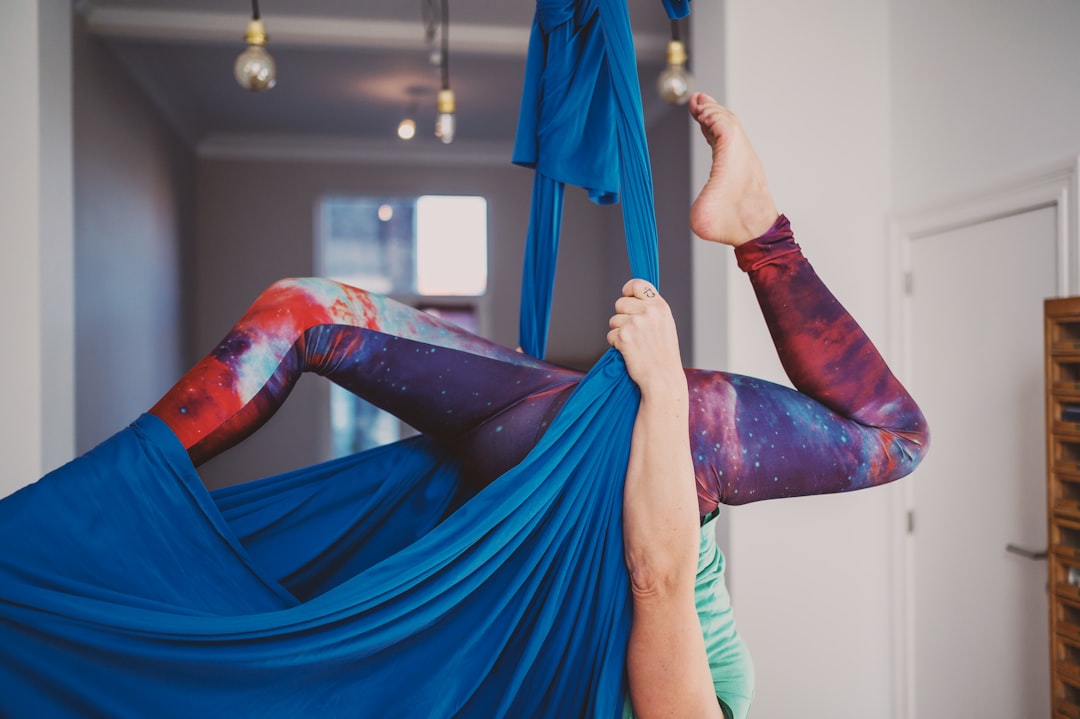
For example, the aerial hammock acts as a supportive swing, enabling practitioners to engage in forward bends and backbends with enhanced stability and flexibility. This support facilitates a deeper exploration of poses and stretches, offering a different perspective on familiar yoga movements and creating an immersive and transformative experience for individuals. The aerial hammock's ability to provide a secure foundation for various poses sets aerial yoga apart from traditional yoga and contributes to its appeal among those looking for a novel and effective approach to their yoga practice.
In addition to the unique support provided by the hammock, aerial yoga introduces inverted poses that offer spinal decompression and muscular relaxation. This distinctive feature allows practitioners to experience an entirely new dimension of yoga, promoting a sense of weightlessness and freedom that is not typically attainable in traditional yoga practice. The exploration of inverted poses, facilitated by the aerial hammock, adds an exciting and rejuvenating element to the practice, making aerial yoga an attractive choice for individuals seeking a fresh and exhilarating yoga experience.
The incorporation of aerial yoga poses such as the cross position, star inversion, and one-legged king pigeon pose showcases the diversity and versatility of movements that practitioners can explore. Each pose offers distinct benefits for strength, flexibility, and overall well-being, emphasizing the multifaceted nature of aerial yoga as a holistic practice that integrates physical, mental, and emotional elements. The transformative potential of aerial yoga lies in its ability to provide practitioners with a comprehensive and engaging approach to yoga, offering a pathway to self-discovery and wellness.
 The Aerial Yoga Hammock
The aerial yoga hammock serves as a fundamental component that enriches the practice of aerial yoga, offering a unique and versatile platform for practitioners to explore a wide range of poses and movements. This specialized piece of equipment is carefully designed to support up to 300 kilograms, ensuring the safety and comfort of individuals during aerial yoga sessions. Its robust construction and supportive features enable practitioners to engage in various poses and stretches with confidence and security, creating a conducive environment for physical exploration and growth.
Moreover, the aerial hammock's ability to act as a swing and provide support for the hips during forward bends and backbends allows individuals to experience an expanded range of motion and deeper stretches compared to traditional yoga. This unique characteristic empowers practitioners to challenge themselves and explore new possibilities within their practice, fostering a sense of curiosity and accomplishment. The hammock's role in facilitating these movements illustrates its significance as a key element that distinguishes aerial yoga from traditional yoga, offering practitioners a novel and transformative avenue for their yoga journey.
Furthermore, the aerial hammock plays a pivotal role in enabling inverted poses, which provide practitioners with spinal decompression and muscular relaxation. These invigorating poses allow individuals to experience a sense of liberation and rejuvenation, promoting a holistic approach to well-being. The aerial hammock's capacity to support and facilitate inverted poses underscores its essential contribution to the unique and therapeutic nature of aerial yoga, making it an essential and cherished component of the practice.
Exploring Common Aerial Yoga Poses and Techniques
Aerial yoga encompasses a diverse array of poses and techniques that elevate the practice beyond the boundaries of traditional yoga, offering practitioners a rich tapestry of movements and breathwork that promote physical, mental, and emotional well-being. The integration of poses such as the cross position, star inversion, and one-legged king pigeon pose showcases the versatility and dynamism of aerial yoga, providing practitioners with a broad spectrum of movements to explore and master. These poses not only enhance physical strength and flexibility but also foster a deeper connection between the mind and body, emphasizing the holistic nature of aerial yoga as a transformative practice.
For instance, the cross position in aerial yoga allows practitioners to experience gentle stretches and relaxation of the lower back and hips, promoting flexibility and alleviating tension in the body. This pose serves as a foundation for practitioners to cultivate a sense of ease and openness within their practice, fostering a harmonious balance between effort and relaxation. Similarly, the star inversion pose offers practitioners a unique opportunity to engage in spinal decompression and muscular relaxation, creating a sense of weightlessness and liberation that transcends traditional yoga practices. These poses exemplify the dynamic and multifaceted nature of aerial yoga, providing individuals with a rich and diverse canvas for their yoga journey.
Moreover, the techniques employed in aerial yoga emphasize fluid movements and controlled breathing, promoting mindfulness and presence during the practice. Practitioners are encouraged to synchronize their breath with each movement, fostering a sense of calm and focus that transcends the physical aspects of the practice. The mindful integration of breathwork and movements underscores the holistic and meditative nature of aerial yoga, providing practitioners with a transformative and enriching space for self-discovery and introspection. The seamless integration of poses and techniques in aerial yoga reflects its capacity to offer individuals a comprehensive and immersive practice that nurtures the body, mind, and spirit.
 The Physical and Mental Benefits of Aerial Yoga
Aerial yoga offers a wealth of physical and mental benefits that contribute to practitioners' overall well-being, making it a compelling and rewarding practice for individuals seeking a holistic approach to yoga. The practice of aerial yoga promotes improved flexibility, stability, and balance, allowing individuals to develop physical resilience and agility through a diverse range of poses and movements. For example, the star inversion pose not only strengthens the core and arms but also enhances spinal flexibility and decompression, providing practitioners with a comprehensive and invigorating experience. This emphasis on physical well-being underscores the transformative potential of aerial yoga as a practice that promotes strength, flexibility, and overall vitality.
In addition to its physical advantages, aerial yoga offers significant mental benefits, providing practitioners with a space for stress reduction, mental rejuvenation, and enhanced mindfulness. The controlled and fluid movements in aerial yoga promote an enhanced mind-body connection, fostering a sense of calm and balance that transcends the confines of traditional yoga practices. This emphasis on mental well-being highlights the transformative power of aerial yoga as a practice that nurtures the holistic development of individuals, offering a pathway to self-discovery, emotional resilience, and inner harmony.
Furthermore, aerial yoga is known to reduce the risk factors for heart disease, making it a promising and beneficial practice for individuals seeking to improve their cardiovascular health and overall well-being. The unique combination of physical movements, breathwork, and inverted poses in aerial yoga contributes to practitioners' overall cardiovascular fitness, promoting a healthy and resilient heart. This emphasis on heart health underscores the comprehensive and transformative nature of aerial yoga as a practice that encompasses not only physical and mental well-being but also cardiovascular vitality, positioning it as a holistic and impactful form of yoga.
Precautions and Recommendations for Aerial Yoga Practice
While aerial yoga offers a myriad of benefits, it is essential for individuals to consider certain precautions and recommendations to ensure a safe and enriching experience. One important consideration is that aerial yoga may not be suitable for pregnant individuals or those with specific medical conditions. The inversions and dynamic movements involved in aerial yoga may pose potential risks for individuals with certain health concerns, and it's advisable for them to consult with a healthcare professional before embarking on this practice. This emphasis on safety and individual well-being underscores the importance of approaching aerial yoga with mindfulness and attentiveness, ensuring that individuals can make informed choices that align with their unique needs and circumstances.
Moreover, wearing well-fitted clothing is recommended to prevent chafing during practice, ensuring a comfortable and enjoyable experience for practitioners. The aerial hammock may come into contact with the skin during various poses, making it essential for individuals to wear attire that allows for a full range of motion without causing discomfort. By prioritizing the selection of appropriate clothing, individuals can fully immerse themselves in the practice without any distractions, ultimately enhancing their aerial yoga experience. This emphasis on comfort and practical considerations underscores the importance of creating a supportive and inclusive environment for all practitioners, ensuring that individuals can engage in aerial yoga with ease and confidence.
Furthermore, for individuals who are new to aerial yoga, it's vital to communicate any health concerns or physical limitations with the instructor before starting the practice. This open dialogue ensures that the instructor can provide tailored guidance and support, creating a safe and inclusive environment for all participants. By approaching aerial yoga with mindfulness, attentiveness, and a collaborative spirit, practitioners can cultivate a practice that aligns with their individual needs and aspirations, promoting a fulfilling and sustainable aerial yoga journey. This emphasis on open communication and personalized support underscores the transformative potential of aerial yoga as a practice that values the well-being and unique circumstances of each individual, offering a pathway to self-discovery and growth.
Getting Started with Aerial Yoga
If you're new to aerial yoga, it's important to approach the practice with an open mind and a willingness to learn. Listening to your body and communicating openly with instructors is crucial as it helps in understanding and mastering the poses, ensuring a safe and enjoyable experience. As with any new endeavor, the first class may bring about unexpected feelings such as laughter, surprise, and even a hint of dizziness. These reactions are normal as your body adjusts to the unique sensations of aerial yoga, so it's important to embrace them as part of the journey.
Embracing the aerial yoga community can significantly enhance your experience. A supportive and inclusive community can provide encouragement, guidance, and a sense of belonging, which can be especially valuable for beginners. It's an opportunity to learn from and bond with fellow practitioners, creating a positive and enriching environment for your aerial yoga practice. Additionally, being part of a community can lead to the discovery of new insights, tips, and even potential friendships, making your journey into aerial yoga even more fulfilling.
Moreover, finding a welcoming and supportive aerial yoga community can contribute to a positive and enriching practice experience. Being part of a community provides opportunities for practitioners to share experiences, receive support, and foster meaningful connections with like-minded individuals. Additionally, a supportive community can offer valuable resources, such as tips for overcoming challenges and enhancing the practice, making your aerial yoga journey even more rewarding and fulfilling. This emphasis on community and support underscores the transformative potential of aerial yoga as a practice that encourages collaboration, camaraderie, and personal growth, offering individuals a pathway to self-discovery and holistic well-being.
 Practicing Aerial Yoga: At Home and in Studios
When it comes to practicing aerial yoga, individuals have the option of enjoying this unique form of yoga both at home and in professional studios. Aerial yoga can be practiced at home with the right equipment and guidance, offering practitioners the flexibility of integrating the practice into their daily routines. This allows individuals to create a serene and personalized environment that aligns with their preferences and schedules, fostering a deeper connection to the practice. By cultivating a dedicated space for aerial yoga at home, individuals can engage in the practice with ease and convenience, promoting a consistent and sustainable yoga journey.
Moreover, for those who prefer the guidance and support of professional instructors, various studios such as Flying Buddha Studio and Yoga Heights provide expert instruction and a welcoming environment for aerial yoga practice. These studios cater to practitioners of all levels, from beginners to advanced students, ensuring that everyone can engage in the practice at their own pace and comfort level. Additionally, the communal aspect of attending classes at a studio can contribute to a sense of belonging and motivation, as individuals have the opportunity to connect with like-minded practitioners, share experiences, and receive personalized feedback from experienced instructors. The supportive and inclusive environment of professional studios underscores the transformative potential of aerial yoga as a practice that fosters connection, growth, and personal development.
Furthermore, with the help of online resources, individuals can easily locate aerial yoga classes near them, facilitating convenient access to this unique form of yoga practice. This accessibility opens up opportunities for individuals to explore different studios, teaching styles, and class formats, enabling them to find the perfect fit for their preferences and goals. Whether at home or in a studio, the practice of aerial yoga offers practitioners a versatile and enriching experience that contributes to physical well-being, mindfulness, and personal growth. By offering flexible options for engaging in the practice, aerial yoga empowers individuals to cultivate a yoga journey that aligns with their unique circumstances and aspirations, offering a pathway to self-discovery and holistic well-being.
Aerial Yoga Classes, Pricing, and Special Events
Aerial yoga studios provide a diverse range of classes to accommodate practitioners with varying levels of experience and expertise. For instance, beginners can enroll in foundational courses where they learn the fundamental poses, techniques, and safety guidelines under the guidance of experienced instructors. These classes focus on building a strong foundation and understanding of aerial yoga, preparing individuals to progress to more advanced levels as they gain confidence and skill. On the other hand, advanced classes offer challenging sequences, inversions, and dynamic movements for seasoned practitioners looking to enhance their aerial yoga practice and take it to the next level. By offering a comprehensive spectrum of classes, studios ensure that aerial yoga is inclusive and accessible to all individuals, regardless of their proficiency.
In terms of pricing, aerial yoga studios typically provide flexible options to suit practitioners' preferences and schedules. This includes drop-in classes for those seeking occasional participation, monthly memberships for more regular attendees, and unlimited memberships for dedicated enthusiasts looking to fully immerse themselves in their practice. Furthermore, many studios offer discounts for specific groups such as veterans, college students, and school teachers, aiming to make aerial yoga more financially accessible and inclusive for a wider community. These pricing structures are designed to cater to the diverse needs and circumstances of individuals, fostering a welcoming and supportive environment for all practitioners.
Moreover, beyond standard classes, aerial yoga studios frequently organize workshops, teacher training programs, and special events to enrich practitioners' experience and knowledge. These initiatives provide unique opportunities for individuals to deepen their understanding of aerial yoga, explore specific aspects of the practice in more detail, and connect with like-minded individuals. For instance, workshops may focus on advanced poses, therapeutic applications, or aerial yoga for specific demographics, offering valuable insights and skills to participants. Additionally, teacher training programs enable passionate practitioners to pursue certification and share their love for aerial yoga with others. Special events, on the other hand, may include community gatherings, themed classes, or collaborative sessions, fostering a sense of belonging and camaraderie within the aerial yoga community. By offering these diverse opportunities, studios create a dynamic and engaging environment that goes beyond traditional classes, encouraging practitioners to explore and expand their aerial yoga journey.


